Make Your Own Boot Warmers

Boot_Warmers_Step_5

By Skimum Richelle

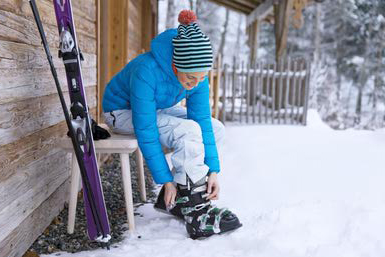
As we learned in a previous blog post, putting your ski boots on in the morning can sometimes be a chore.  A cold pair of boots can make it all the more difficult.  When cold, your boot’s plastic shell becomes very stiff.  Well, now that chore can be a bit easier.  In just a few short minutes, you can easily make your own boot warmers that will warm up your liners, and even your shells, while you are driving up the canyon.  Introducing Richelle’s (soon to be famous), home-made, microwaveable boot warmers!  Follow these five simple steps to make your own boot warmers.

Step 1

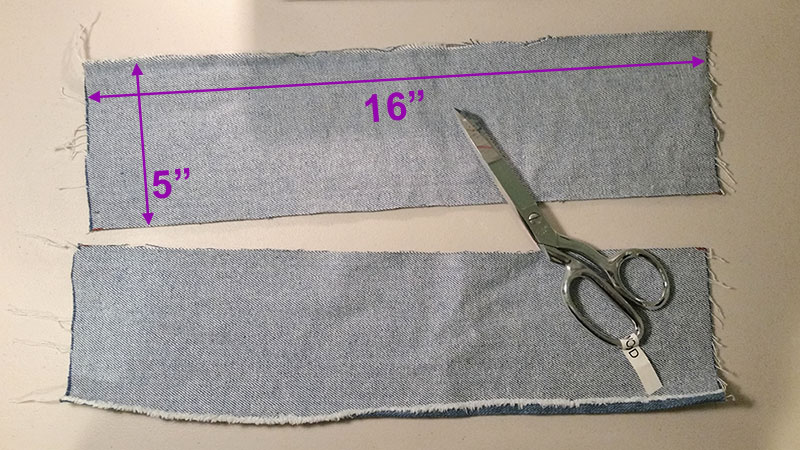
Find some scrap material.  I prefer a mid-weight fabric, like a light denim.  Something durable enough to take a beating, but thin and flexible enough to work with.  Cut your fabric into two rectangle strips measuring 5 x 16 inches each.

Boot_Warmers_Step_1

Step 2

Fold your strips in half (inside out). Pin it if necessary.

Boot_Warmers_Step_2

Sew two lines about 1/8 to 1/16 inch apart and about 1/8 inch from the cut edge of the fabric.  (I double or triple stitch everything on my boot warmers.  You don’t want your filler material to fall out!).
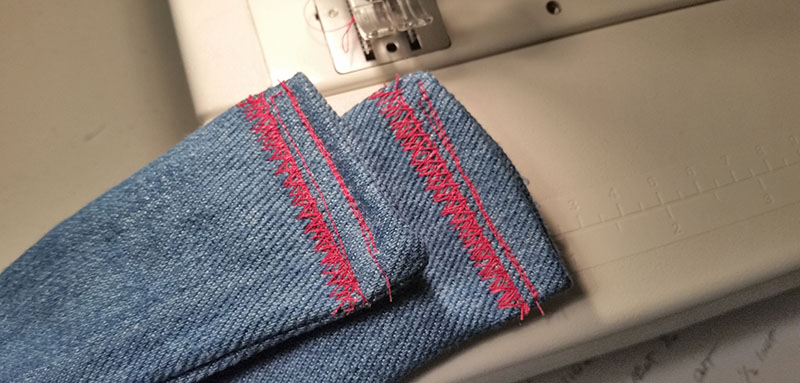
Boot_Warmers_Step_2B

Step 3

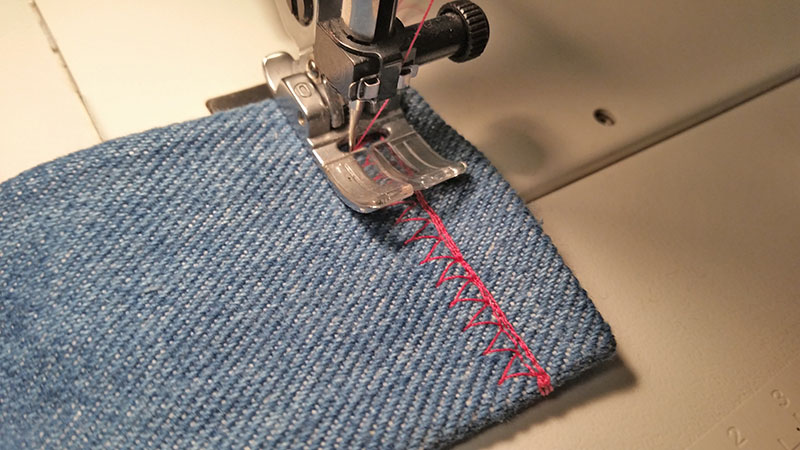
Turn the tubes right-side out.  You will now have to fold in one of your open ends, about a ½ inch (see photo below) and then sew it closed.  Boot_Warmers_Step_3B

I like to use a tight zig-zag stitch and then I run a single stitch on either side of the zig-zag stitch.  Be creative and come up with your own pattern.  I also like to use a fun accent thread color.

Boot_Warmers_Step_3CStep 4

Fill the bag about 3/4 to 4/5 full with your heating medium.  You will need between 1 and 1 ½ cups per tube.  I use a funnel to fill mine with rice (just regular rice).  Be sure to leave about 3 inches of room at the top.  I prefer rice, but I have also used wheat.  I’ve heard of other people using various dried beans, barley and even cherry pits.  You can also add some aromatics such as lavender, rose petals, ground cloves, nutmeg, cinnamon, mint, or even, essential oils to make it smell yummy!.

Boot_Warmers_Step_4jpg

Step 5

Carefully fold in the open end about 1/2 inch, as you did in Step 3, and sew it closed with a series of stitches as before.

Boot_Warmers_Step_3D


But what if I’m not the best seamstress, you may ask?  Who cares!  They go inside your boots, for crying out loud!  It’s not like you are wearing them (although you will be tempted to – they are so nice and warm!).  The above photos prove that I’m certainly no artist with a sewing machine.  Make them as pretty or as ugly as you want.  Just make sure you at least double stitch everything to ensure you don’t end up with a boot full of rice.

That’s it!  Now go throw your new boot warmers in the microwave for about 2 to 2 ½ minutes on high.  Remove from the microwave and then carefully tuck the warmers inside your boots as far as you can into the toe area.  Your feet will love you when you slide them into to those cozy, pre-warmed boots!

Good luck.  Let me know how yours turn out.  Send me some photos!

Good Skiing Part 3

By Susi, Instructor at Snowbird Mountain School

5 Secrets to Managing Powder Gracefully

The Powder came right on time for our Wednesday morning coaching session.  The Skimums ventured out to lower Old Ladies (don’t read anything into the name; we don’t judge the guys when they ski Baldy) then to Hoop’s and found some nice creamy powder to play in!  Skimums found 5 simple rules to turned them into serious powder hounds.

1.  It’s all about the flow: Think about flowing down the mountain in a smooth line making round turns with little edge angle. Create a rhythm!
2.  Patience is key: In powder it takes more time for the skis to react to skier input. Steer your legs to create open round C-shaped turns, so that the skis keep flowing. Z-turns are harder to manage and interrupt the flow.
3.  Speed is your friend: The skis are buried in the snow which creates more friction compared to groomed terrain. Powder slows you down and you need speed to keep moving!
4.  Stay balanced over your feet: Contrary to common belief, you don’t lean back in powder. Ski in a balanced position (think “crouching tiger”).  Conditions change with every turn, so you have to work constantly to stay in balance!  Backseat skiing is not healthy for the knees and way too tiring!!
5.  Build a platform:  It is very helpful to narrow your stance, so that the skis build somewhat a single platform and are easier to turn.  Most importantly, to become great in powder you have to keep skiing powder!Hopefully, we get another powder opportunity this week and we can even explore other secret places on the mountain!!

Come out and join us for the last coaching session for the Skimums this season!!  RSVP by Tuesday afternoon so we can have plenty of Mountain School instructors there.
If you did not have a chance to join us, check out this video: http://youtu.be/SavrnMGIhzg
Sources: www.thesnowpros.org
PSIA Alpine Technical Manual

Good Skiing Part 2

RSVP TODAY FOR FREE GROUP LESSON #3 THIS WEDNESDAY.  Powder?!?

By Susi, Instructor at Snowbird Mountain School

IMG_2085

Skimum Nicole gains greater control by pointing that Belly button downhill, getting the weight on the outside ski and “schmearing”

 Leg rotation and skiing bumps efficiently  

Our technical focus in our second coaching session was turning our legs more than our upper body… What??? Yes, it is the truth: a turn starts with the body parts closest to the snow: the feet and the legs. Often times we use our shoulders or our hips to start a turn, we are twisting shoulders and arms uphill at the end of a turn, we flail with our arms to help us stay in balance… These movements are not very efficient and not always graceful  😉.

The Skimums worked hard to keep their upper bodies disciplined, rotate their feet and legs to steer their skis through the turn, while keeping their belly buttons – and other body parts – directed towards the tip of the outside (or downhill) ski. We realized that the release of the energy created by twisting the lower half against the upper half of the body made it much easier to start a turn and to point the skis in the opposite direction.

We also put our “schmearing” skills to use.  We’re not carving into the turn.  As Skimum Denice visualized, “It’s like spreading cream cheese on a bagel — the schmear.”  As we release energy placing weight on that outside ski, gravity allows the entire bottom of the ski to coast downhill. More contact means more control over our direction and speed.

To apply the new skills we found some crusty and then soft bumps, where we POINTED our belly buttons into the direction of travel, rotated our legs on TOP of the bump, SCHMEARED down the back side of the bump to control our speed, then GLIDED up the next bump!  Like magic, Skimums found they had total control.  Turning and shmearing, turning and shmearing… In control, with grace and efficiency!!

If you did not have a chance to be with us or you want to review turning the legs under a stable upper body and bump technique check out these videos

Good Skiing: Pro Tips for Skimums

RSVP BY TUESDAY FOR FREE GROUP LESSON #2 ON WEDNESDAY, JAN. 28TH

By Susi, Instructor for Snowbird Mountain School

DSC02112What is good skiing? The definition of good skiing is different for everybody. I like this one from David Oliver, PSIA (Professional Ski Instructors of America) Alpine team member: “…. The idea of good skiing is about the ability to make a choice about where you want to go at any moment – whether its forwards or backwards or in the air, or moving down a race course at 70 miles per hour…”

Whatever the intended and desired outcomes are: skiing is based on a common set of fundamentals that can be universally applied.

What does that mean for the Skimums? During our ski lessons at Snowbird we are working on improving our skiing to enjoy this beautiful mountain and all it has to offer even more! In session 1 last Wednesday, we focused on directing our balance toward the outside (or downhill) ski. Why? The outside ski is our workhorse. With the outside ski we get stability and we control the shape of the turn.

If you did not have a chance to join us on Wednesday or if you want to review the one footed drills check out the video with Katie Fry and Nick Herrin.

https://www.youtube.com/watch?v=MSRk9dB8adk

Join us next Wednesday for more tips and tricks to improve your game!!  To make sure Mountain School sends enough instructors, please RSVP by Tuesday for the January 28th FREE Group Lesson (gratuity suggested) by sending comment below.  

IMG_2026Sources: www.thesnowpros.org, PSIA Alpine Technical Manual

Seriously, I Need A Tool For Buckling My Ski Boots?


SkiBootsWoman

2015 SKIMUMS GEAR REVIEW SERIES                

 by Skimum Richelle

*** See an updated product review and comparison at: Ski Boot Buckle Lever Comparison 2017 ***

It’s kind of sad when one of the toughest things about skiing is putting on your boots.  We can engineer a rover to land and drive on Mars but, somehow, ski boot manufacturers can’t design a boot that is easy to get on and off.  For years I strained and bruised my hands and fingers trying to buckle my boots nice and tight.

One day, while browsing the ads in the back of a skiing magazine, I came across a small ad for a plastic lever tool, promising to make buckling your ski boots a breeze.  It is called Ski Tool, sold by Ski Tool Company LLC.   I was a bit skeptical, but the price was right.  I ordered it from the company’s website and it showed up about a week later.

 Ski Tool™ Multipurpose Boot Buckler and Carrier

Ski Tool™ Multipurpose Boot Buckler and Carrier

Does it work?
Yes!  It really does make buckling those last couple notches MUCH easier.  No more bruised hands!  Yay!  It also is great for kids to help them buckle up all by themselves.  I do, however, occasionally have trouble with my older Dalbello boots buckles.  The tool will sometimes get caught in the buckle once it locks down.  Not the end of the world, but can be a bit frustrating.  It works great on all of our other boot buckles, however!

 Ski Tool™ Multipurpose Boot Buckler and Carrier

How durable is it?
My biggest concern when I purchased this tool was that, because it is made of plastic, it would break after a few uses.  Well, I’ve been using it now for 2 ½ years and it is holding up great.  I put some serious torque on this tool and it has the scratches and dents to prove it.  Even after all the abuse I have put it through, it has never failed on me.  Well worth the $10 spent.  In my opinion, the Ski Tool is a must for every boot bag!  If anything, I could use a couple more so we don’t have to pass it around so much when we are all putting on our boots at the same time.  Skimum Approved!

The Ski Tool can be purchased direct from the company’s website for $7.49 plus $2.95 for S&H.  Also look for it at your local ski shop.


***ARTICLE UPDATE***

Unfortunately, my SkiTool lever tool broke last year.  I have since found other boot tools  and have an updated product review and comparison at: Ski Boot Buckle Lever Comparison 2017  – Skimum Richelle


SOLUTIONS for 2015

Ski Mums Powder 2

A straight line doesn’t always get you where you want to go

By Skimum Paula

In 2015, I’m looking at things differently, as in, laying my head on the edge of the sofa and finding cobwebs under the table differently, and I’m starting with “resolutions.” Resolutions, a New Year’s tradition of making them on the 1st and failing to keep them by the 4th, are hard for most people. This year, I’m working on reSolutions instead.

A problem-solver by nature (What woman isn’t?), I can usually identify and tackle most practical issues coming my way. I’m taking that approach to other more personal things in my life this year. The trick with Solutions is being honest about identifying the actual issues and then recognizing the skills and resources I already have to solve them or, as friends and hubby often remind me, let them go. Even better, unlike resolutions, Solutions are flexible and expected to fail now and then.

My first Solution is to spend time on the mountain with friends in order to nourish my body and soul. Skimums will meet starting THIS WEDNESDAY, January 7th at 9:30am at the Gadzoom Lift. Hope to see you all there.

Lodging Deal for Powderhounds

DSC02306You’ve just checked the Wasatch Snow Forecast or Utah Ski Weather blogs (which are great and should be bookmarked on your mobile devices), and they’re geeking out over the GFS and the EC and a bunch of other things that we mere mortals will never understand, but their summaries all say “powder day,” which is like cooking bacon next to a Catholic on Good Friday at 11:55pm.  Bring It On!  What do you do? What do you do?

Hopefully, you bought a White Room at Snowbird before the Jan 1st deadline, which allows you to stay at the Bird for $99 (reserve up to 48 hours in advance; great for locals), get up the next morning, beat the crowds that are probably waiting for Avalanche Control to open the road after the monster storm, and make those first tracks down Regulator or the Bookends in what we know as “The Greatest Snow on Earth.”  This “buy now, use later” is a steal of a deal and can be used throughout the winter season and into summer.  Check the Snowbird website for details and restrictions (there aren’t many), and take advantage of this deal before it expires.

I Can’t Find the Plug!

IMG_1322If Skimums preaches anything (and it doesn’t; well, not often), it’s to remember to recharge your batteries so you can give more to others.  This Wednesday is your chance to do just that before the last holiday push!  Snowbird is hosting a SkiTreat, a morning lesson by the Mountain School from 9-noon, lunch, spa tour and half-price access. The cost is only $40. #cheeperthantherapy (and a lot more fun).  RSVP to the Mountain School today at (801)947-8222.  This event will get you plugged in, charged up and ready to handle the holidays and the New Year.

Where Are My Pants!

By Skimum Paula

Is there anything worse than getting to the mountain and realizing that your ski pants are still hanging in your closet?  No, as I discovered on a recent powder day at the Bird.  Most Skimums know that keeping your family members’ ski gear in individual bags is a great way to stay organized, but over the season, things go in, things go out, things get washed, things get lost… You know the drill.

So, after ending up pantless on a powder day, I decided to get organized and crafty designing the Skimums SkiTag, a simple laminated list attached to each family member’s ski bag to check off before heading out the door.  Feel free to download.  I’d hate to see you pantless on Peruvian.

SkiTag